Arduino ESP32 filesystem uploader

轉自 me-no-dev Github

Arduino plugin which packs sketch data folder into SPIFFS filesystem image,
and uploads the image to ESP32 flash memory.

Installation

  • Make sure you use one of the supported versions of Arduino IDE and have ESP32 core installed.
  • Download the tool archive from ESP32FS-v0.1.zip
  • In your Arduino sketchbook directory, create tools directory if it doesn't exist yet.
  • Unpack the tool into tools directory (the path will look like <home_dir>/Arduino/tools/ESP32FS/tool/esp32fs.jar).
  • Restart Arduino IDE.

On the OS X create the tools directory in ~/Documents/Arduino/ and unpack the files there

Usage

  • Open a sketch (or create a new one and save it).
  • Go to sketch directory (choose Sketch > Show Sketch Folder).
  • Create a directory named data and any files you want in the file system there.
  • Make sure you have selected a board, port, and closed Serial Monitor.
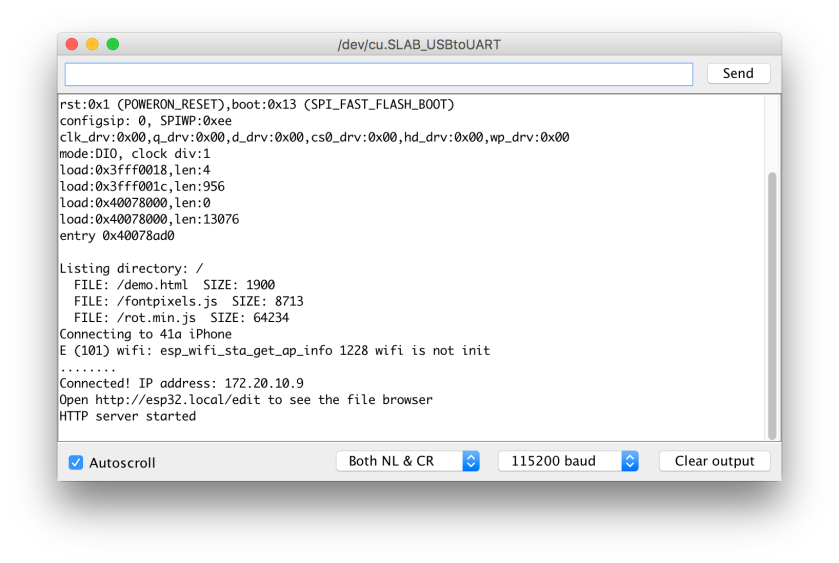
  • Select Tools > ESP32 Sketch Data Upload menu item. This should start uploading the files into ESP32 flash file system.

    When done, IDE status bar will display SPIFFS Image Uploaded message. Might take a few minutes for large file system sizes.

Credits and license

  • Copyright (c) 2015 Hristo Gochkov (hristo at espressif dot com)
  • Licensed under GPL v2 (text)
  • Maintained by Hristo Gochkov (hristo at espressif dot com)

Issues and suggestions

File issues here on github, or ask your questions on the esp32.com forum.

ESP-01s GPIO WebServer

This project use WebServer library to host a GPIO control and monitoring web page.

Known Issues

  1. This WebServer response synchronously. It could miss massages when you request frequently.
    Use ESPAsyncWebServer may solve this issue.

Hardware

  • ESP-01s
  • LEDs

Software

Code

GPIO-8266.zip

.
├── GPIO-8266.ino
└── data
    └── demo.html

Procedure

  1. Open “GPIO-8266.ino" and custom your code contained wifi info:
    // Modify these as you need
    const char* ssid = "41a iPhone";
    const char* password = "********";
    
  2. Upload the GPIO-8266.ino with following config

    config

  3. Upload data by clicking Tools -> ESP32 Sketch Data Upload.

    Wait until upload done.

  4. Make sure your Wi-Fi hotspot is available.

    Connect your Mac/PC to the Wi-Fi. Then open any browser, enter “http://esp8266.local/demo.html" in the URL. (Or http://ip/demo.html). ESP8266’s IP will show in Serial Monitor when it connect to your Wi-Fi.

Screenshot

result

ESP32 Web LED Matrix

This project controls the LED Matrix by ESP32.

You can change the text on the LED Matrix with a webpage which is hosted by ESP32.

Known issues

  1. The fonts differ from OS. Effects are not the same between Mac and iPhone.
  2. The font is not optimized for LEDs. It can be replaced by unifont in BDF format.
  3. Or use font AR PL New Sung(Firefly Sung) with changing code in fontpixel.js form if (data32[i] & 0x80000000) to if (data32[i] > 0x40000000), the effect becomes better!
    • 12 x 12:12
    • 14 x 14:14
    • 16 x 1616

Hardware

  • 8×8 LED Matrix with driver Max7219, 8 pcs
  • ESP32 Dev Board
  • Wi-Fi Hotspot Device (Smart phone, Router … etc.)

Software

Code

CtrlMatrixLED16X32_ChangeMessage.zip

.
├── CtrlMatrixLED16X32_ChangeMessage.ino
├── LedControl.cpp
├── LedControl.h
└── data
    ├── demo.html
    ├── fontpixels.js
    └── rot.min.js

Procedure

  1. Connect the LED Matrices with these pin as following figures:
    LED Matrices ESP32 DEV Board
    VCC 5V
    GND GND
    DIN Pin 12
    CS Pin 14
    CLK Pin 13

  2. Connect all the input and output by daisy chain on the matrices.IMG_5269
  3. Open “CtrlMatrixLED16X32_ChangeMessage.ino" and custom your code contained wifi info:
    // Modify these as you need
    const char* ssid = "41a iPhone";
    const char* password = "********";
    
  4. Connect ESP32 and upload the sketch by following config:ESP32-config
  5. In Arduino IDE, Click Tools -> ESP32 Sketch Data Upload. Wait until upload done.
  6. Make sure your Wi-Fi hotspot is available.Connect your Mac/PC to the Wi-Fi. Then open any browser, enter “http://esp32.local/demo.html" in the URL. (Or http://ESP32 ip/demo.html). ESP32’s IP will show in Serial Monitor when it connect to your Wi-Fi.

serialMonito

7. Now you can type any text you want. It will show text on the matrix simultaneously.

IMG_5255

Arduino ESP8266 filesystem uploader

轉自Github – Arduino ESP8266 filesystem uploader

Arduino plugin which packs sketch data folder into SPIFFS filesystem image,
and uploads the image to ESP8266 flash memory.

Tested with the following Arduino IDE versions: 1.6.5-r2, 1.6.6

Installation

  • Make sure you use one of the supported versions of Arduino IDE and have ESP8266 core installed.
  • Download the tool archive from releases page.
    Or here ESP8266FS-0.3.0.zip, source code arduino-esp8266fs-plugin-0.3.0
  • In your Arduino sketchbook directory, create tools directory if it doesn't exist yet.
  • Unpack the tool into tools directory (the path will look like <home_dir>/Arduino/tools/ESP8266FS/tool/esp8266fs.jar).
  • Restart Arduino IDE.
  • On the OS X create the tools directory in ~/Documents/Arduino/ and unpack the files there becomes <home_dir>/Documents/Arduino/tools/ESP8266FS/tool/esp8266fs.jar

Usage

  • Open a sketch (or create a new one and save it).
  • Go to sketch directory (choose Sketch > Show Sketch Folder).
  • Create a directory named data and any files you want in the file system there.
  • Make sure you have selected a board, port, and closed Serial Monitor.
  • Select Tools > ESP8266 Sketch Data Upload menu item. This should start uploading the files into ESP8266 flash file system.
    When done, IDE status bar will display SPIFFS Image Uploaded message. Might take a few minutes for large file system sizes.

Screenshot

Screenshot

Credits and license

  • Copyright (c) 2015 Hristo Gochkov (ficeto at ficeto dot com)
  • Licensed under GPL v2 (text)
  • Maintained by Ivan Grokhotkov (ivan at esp8266 dot com)

Issues and suggestions

File issues here on github, or ask your questions on the esp8266.com forum.

讓Terminal.app的關鍵字有顏色

設定

  1. 以nano編輯bash_profile,打開terminal.app,輸入:

    nano .bash_profile
    
  2. 貼上以下文字:

    export PS1="\[\033[36m\]\u\[\033[m\]@\[\033[32m\]\h:\[\033[33;1m\]\w\[\033[m\]\$
    export CLICOLOR=1
    export LSCOLORS=ExFxBxDxCxegedabagacad
    alias ls='ls -GFh’
    
  3. 按下 Control + O 儲存,再按 Control+X 離開nano文字編輯器

  4. 重新開啟terminal視窗,並輸入lsls -la來確認是否成功
    Screen Shot 2017-10-13 at 12.59.51

特殊字元與顏色控制

上段文字中的第一行

 export PS1="\[\033[36m\]\u\[\033[m\]@\[\033[32m\]\h:\[\033[33;1m\]\w\[\033[m\]\$

意思是將命令提示字串修改成 “username@hostname:cwd $” 的格式,並賦予顏色

  • \u:表使用者的帳號名稱
  • \h:主機名稱
  • \W:目前的工作目錄名稱

文字的顏色是靠 ANSI escape code 來指定的。跳脫字元(Non-printing escape sequence)必須放在 \[\033[\] 中間,而顏色跳脫字元(colour escape sequence)則是在 \[\033[m\] 中間。故\[\033[36m\]意思是在這之後的文字都以36(青色)的顏色來顯示,\[\033[m\]表示結束青色字元區段。

下表顯示在macOS的Terminal的顏色代碼,參考下表來自訂顯示顏色,如使用黑底白字用\[\033[31:47\]

Name FG Code BG Code Terminal.app
Black 30 40 0,0,0
Red 31 41 194,54,33
Green 32 42 37,188,36
Yellow 33 43 173,173,39
Blue 34 44 73,46,225
Magenta 35 45 211,56,211
Cyan 36 46 51,187,200
White 37 47 203,204,205
Bright Black 30;1 100 129,131,131
Bright Red 31;1 101 252,57,31
Bright Green 32;1 102 49,231,34
Bright Yellow 33;1 103 234,236,35
Bright Blue 34;1 104 88,51,255
Bright Magenta 35;1 105 249,53,248
Bright Cyan 36;1 106 20,240,240
Bright White 37;1 107 233,235,235

而第二行和第三行設定LSCOLORSLSCOLORS有22個字元,第一個字元代表在Terminal顯示目錄的文字顏色,第二個字元代表文字的背景…以此類推。

  1. Directory
  2. Symbolic Link
  3. Socket
  4. Pipe
  5. Executable
  6. Block special
  7. Character special
  8. Executable with setuid bit set
  9. Executable with setgid bit set
  10. Directory writable to others, with sticky bit
  11. Directory writable to others, without sticky

LSCOLORS定義的顏色如下表:

code colour code colour
a black A bold black, as dark grey
b red B bold red
c green C bold green
d brown D bold brown, as yellow
e blue E bold blue
f magenta F bold magenta
g cyan G bold cyan
h light grey H bold light grey
x default foreground/background X default foreground/background

所以剛剛設定的export LSCOLORS=ExFxBxDxCxegedabagacad代表,目錄用粗體藍字顯示,目錄背景是用預設值…以此類推。

若要自訂LSCCOLOR可用geoff.greer.fm的小工具,來協助完成。
Screen Shot 2017-10-13 at 13.06.49

PS1 特殊字元

以下這些是在 PS1 中可以使用的特殊字元,您可以用運這些設計自己的命令提示字串。

  • \a:ASCII bell 字元(07)。
  • \d:格式為 Weekday Month Date 的日期(例如 Tue May 26)。
  • \D{format}:將 format 傳給 strftime(3),然後將輸出的結果放進命令提示字串中,如果 format 是空字串,就會使用目前語系的預設的格式,其中的大括號不可以省略。
  • \e:ASCII 跳脫字元(escape character,033)。
  • \h:機器的簡短主機名稱(hostname),只顯示到第一個句點之前。
  • \H:機器的完整主機名稱(hostname)。
  • \j:目前的 shell 所掌控的 jobs 數量。
  • \l:the basename of the shell’s terminal device name
  • \n:換行。
  • \r:carriage return
  • \s:the name of the shell, the basename of $0 (the portion following the final slash)
  • \t:現在時間,24 小時制(HH:MM:SS)。
  • \T:現在時間,12 小時制(HH:MM:SS)。
  • \@:現在時間,12 小時制(HH:MM AM/PM)。
  • \A:現在時間,24 小時制(HH:MM)。
  • \u:目前使用者的使用者名稱(username)。
  • \v:目前的 bash shell 版本(如 2.00)。
  • \V:目前的 bash shell 詳細版本(如 2.00.0)。
  • \w:目前的工作目錄完整路徑,若在 $HOME 中,則以 ~ 顯示。
  • \W:目前的工作目錄名稱,若在 $HOME 中,則以 ~ 顯示。
  • \!:目前指令的歷史紀錄編號。
  • \#:目前指令的編號。
  • \$:如果是 root 管理者,則顯示 #,否則顯示 $
  • \n:以八進位表示字元,例如 \033。
  • \\:反斜線。

參考資料:

Python安裝pip方式

pip是Python的套件管理模組,在Python 2 >=2.7.9 or Python 3 >=3.4的版本中,都已內建pip,不需要再執行安裝步驟。

Python安裝pip方式

安裝pip in macOS

macOS一般都內建Python,並包含pip插件。
可在終端機(terminal.app)輸入pip -v(Python3:python3 -m pip -v),檢查是否已經安裝
若出現錯誤時,則必須自行安裝pip,直接在終端機直接運行:

sudo easy_install pip

安裝完畢後,在終端機輸入pip -v(Python3:python3 -m pip -v),則可看到相關指令

Screen Shot 2017-10-12 at 16.30.18

安裝pip in Windows

  1. 開啟cmd,到easy_install.exe的根目錄下執行命令:

    easy_install.exe pip
    
  2. 在PythonXX\Scripts資料夾找到pip.exe

  3. 將pip.exe的路徑添加到環境變量PATH中

升級pip或升級其他套件

On Linux or macOS:

pip install -U pip           # 升級pip
pip install -U SomePackage   # 升級SomePackage

On Windows:

python -m pip install -U pip         # 升級pip
python -m pip install -U SomePackage # 升級SomePackage

安裝套件

pip設計是使用terminal/cmd來下指令,若要安裝一模組稱SomePackage,範例如下:

python -m pip install SomePackage           # 安裝SomePackage
python -m pip install SomePackage==1.0.4    # 指定版本
python -m pip install "SomePackage>=1.0.4"  # 指定版本需大於1.0.4
python -m pip install --upgrade SomePackage # 升級SomePackage

也可以指定一個網路連結來安裝:

pip install install https://example.com/virtualenv-1.6.4.zip
pip install git+https://github.com/simplejson/simplejson.git
pip install svn+ssh://svn.zope.org/repos/main/zope.interface/trunk/

若同時安裝很多版本的Python,為了區分安裝到哪個版本,
在Linux, macOS可以用帶版本的python:

python2   -m pip install SomePackage  # default Python 2
python2.7 -m pip install SomePackage  # specifically Python 2.7
python3   -m pip install SomePackage  # default Python 3
python3.4 -m pip install SomePackage  # specifically Python 3.4

在Windows,可以用py啟動Python,並指定Python版本:

py -2   -m pip install SomePackage  # default Python 2
py -2.7 -m pip install SomePackage  # specifically Python 2.7
py -3   -m pip install SomePackage  # default Python 3
py -3.4 -m pip install SomePackage  # specifically Python 3.4

移除套件

pip uninstall SomePackage

參考資料: